BootstrapにOneThird CMSを組み込む方法
CSSフレームワーク、BootstrapにOneThird CMSを組み込む方法を説明します
手順1:OneThird CMSをインストールする
OneThird Web Serverを使い、ローカルPCにOneThird CMSをインストールしてください
インストール方法 (OneThird Web Server編)
手順2:Bootstrapをダウンロードし、設置する
ダウロード先は、 http://getbootstrap.com/getting-started/#download
です (2014/07/07現在)
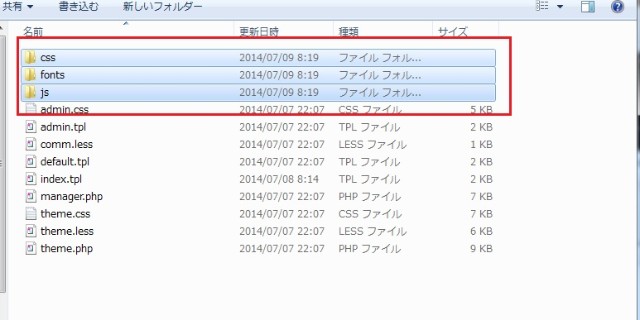
解凍したファイル内のフォルダ(css,fonts,js)をOneThird CMSのインストールフォルダ/files/1/data以下にコピーします
次に、BootstrapのBasic template(以下参照)をコピーして、default.tplにペーストします
<!DOCTYPE html>
<html lang="en">
  <head>
    <meta charset="utf-8">
    <meta http-equiv="X-UA-Compatible" content="IE=edge">
    <meta name="viewport" content="width=device-width, initial-scale=1">
    <title>Bootstrap 101 Template</title>

    <!-- Bootstrap -->
    <link href="css/bootstrap.min.css" rel="stylesheet">

    <!-- HTML5 Shim and Respond.js IE8 support of HTML5 elements and media queries -->
    <!-- WARNING: Respond.js doesn't work if you view the page via file:// -->
    <!--[if lt IE 9]>
      echo error- src="https://oss.maxcdn.com/html5shiv/3.7.2/html5shiv.min.js"></script>
      echo error- src="https://oss.maxcdn.com/respond/1.4.2/respond.min.js"></script>
    <![endif]-->
  </head>
  <body>
    <h1>Hello, world!</h1>

    <!-- jQuery (necessary for Bootstrap's JavaScript plugins) -->
    echo error- src="https://ajax.googleapis.com/ajax/libs/jquery/1.11.1/jquery.min.js"></script>
    <!-- Include all compiled plugins (below), or include individual files as needed -->
    echo error- src="js/bootstrap.min.js"></script>
  </body>
</html>
手順3:BootstrapのBasic templateにOneThird CMSのシステムタグを組み込む
このテンプレートにOneThird CMSのシステムタグを埋め込みます
OneThird CMSのシステムテーマはCSSフレームワークと相性の良い、v7を使用します
以下のURLからシステムテーマ v7をダウンロードして下さい
システムテーマを解凍し、インストールファイルに上書きコピーしてください
解凍されたテンプレートファイル(default.tpl)を修正します
最小限必要変更は次の7種類、それとjQueryのインクルードが必要です
1.テーマ専用プログラムの読み込み
{$load('php',".data/theme")}
システムツールバーのタグとパンくずリストのタグを提供します
他のタグより早く読み込む必要があります
2.ヘッダーの展開
{$ut->expand('head')}
各種メタタグ(タイトル、デスクリプション、カノニカル、OGP)に展開されます
3.OneThird CMSのシステム(システムツールバー等)のCSS
{$load('less',"{$config['site_url']}css/onethird.7")}
システムツールバーのCSSをロードします
4.プラグインが使うCSSの展開
{$ut->expand('css',1)}
システム以外のプラグインが使うCSSに展開されます
5.システム/プラグインが展開するJavascript
{$ut->expand_sorted('js',1)}
プラグインとシステムツールバーが使うjavascriptに展開されます
ここまではヘッダ内に設置します
6.OneThird CMSのシステムツールバープログラム
{$call('system_toolbar')}
OneThird CMSのシステムツールバーのHTMLとjavascriptに展開されます
bodyタグの最後に設置します
7.システムとプラグインが使う追加のHTML、Javascript(ダイアログ、ログインjavascript等)
{$ut->expand('meta')}
プラグインが使用するHTMLとjavascriptに展開されます
bodyタグの最後に設置します
以上のタグを、先ほどのテンプレートに加えます
<!DOCTYPE html>
<html lang="en">
  <head>
    <meta charset="utf-8">→remove
    <meta http-equiv="X-UA-Compatible" content="IE=edge">
    <meta name="viewport" content="width=device-width, initial-scale=1">
    <title>Bootstrap 101 Template</title> → remove
     {$load('php',".data/theme")}{$ut->expand('head')} → add
     {$load('less',"{$config['site_url']}css/onethird.7")} → add

    <!-- Bootstrap -->
    <link href="css/bootstrap.min.css" rel="stylesheet">

    <!-- HTML5 Shim and Respond.js IE8 support of HTML5 elements and media queries -->
    <!-- WARNING: Respond.js doesn't work if you view the page via file:// -->
    <!--[if lt IE 9]>
      echo error- src="https://oss.maxcdn.com/html5shiv/3.7.2/html5shiv.min.js"></script>
      echo error- src="https://oss.maxcdn.com/respond/1.4.2/respond.min.js"></script>
    <![endif]-->
   {$ut->expand('css',1)}{$ut->expand_sorted('js',1)}→add
  </head>
  <body>
    <h1>Hello, world!</h1>

    <!-- jQuery (necessary for Bootstrap's JavaScript plugins) -->
    echo error- src="https://ajax.googleapis.com/ajax/libs/jquery/1.11.1/jquery.min.js"></script>
    <!-- Include all compiled plugins (below), or include individual files as needed -->
    echo error- src="js/bootstrap.min.js"></script>
     {$call('system_toolbar')}{$ut->expand('meta')}→add
  </body>
</html>
2行個所削除、4行追加です(jqueryはもともとロードしているので不要です)
手順4:パスの調整を行う
次に、パスの調整を行います
このままでは、パスが見つからずにエラーとなります
OneThird CMSでは、必ずタグでパス指定するようにしてください
そうすることにより、ローカル環境と本番環境へのデータの移動の際、パスの調整が不要になります
今回は、dataフォルダを参照したいので{$params['data_url']}を使ってください
{$params['data_url']}は、この場合 インストールフォルダ/files/1/data/ に展開されます
9行目の <link href="css/bootstrap.min.css" rel="stylesheet">
を <link href="{$params['data_url']}css/bootstrap.min.css" rel="stylesheet">
26行目の<script src="js/bootstrap.min.js"></script>
を<script src="{$params['data_url']}js/bootstrap.min.js"></script>
以上の2箇所の修正で、OneThird CMSのシステムタグの組み込みが終わりました
<!DOCTYPE html>
<html lang="en">
  <head>

    <meta http-equiv="X-UA-Compatible" content="IE=edge">
    <meta name="viewport" content="width=device-width, initial-scale=1">

     {$load('php',".data/theme")}{$ut->expand('head')}
     {$load('less',"{$config['site_url']}css/onethird.7")}

    <!-- Bootstrap -->
    <link href="{$params['data_url']}css/bootstrap.min.css" rel="stylesheet">

    <!-- HTML5 Shim and Respond.js IE8 support of HTML5 elements and media queries -->
    <!-- WARNING: Respond.js doesn't work if you view the page via file:// -->
    <!--[if lt IE 9]>
      echo error- src="https://oss.maxcdn.com/html5shiv/3.7.2/html5shiv.min.js"></script>
      echo error- src="https://oss.maxcdn.com/respond/1.4.2/respond.min.js"></script>
    <![endif]-->
   {$ut->expand('css',1)}{$ut->expand_sorted('js',1)}
  </head>
  <body>
    <h1>Hello, world!</h1>

    <!-- jQuery (necessary for Bootstrap's JavaScript plugins) -->
    echo error- src="https://ajax.googleapis.com/ajax/libs/jquery/1.11.1/jquery.min.js"></script>
    <!-- Include all compiled plugins (below), or include individual files as needed -->
    echo error- src="{$params['data_url']}js/bootstrap.min.js"></script>
     {$call('system_toolbar')}{$ut->expand('meta')}
  </body>
</html>
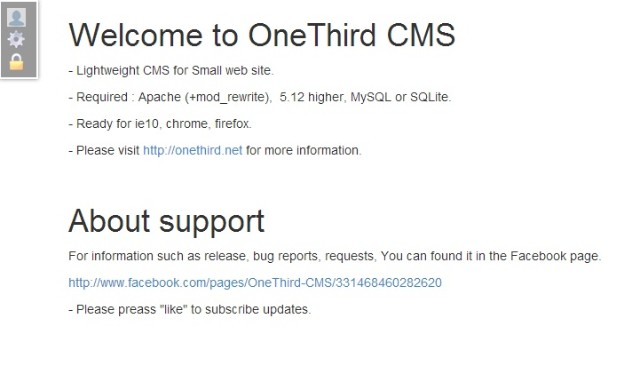
以下の表示がでれば成功です、OneThird CMSのシステムツールバーがでればOKです

次に、本文の修正ができるように、タグを埋め込みます
手順5:CMSらしくなるようにタグを埋め込む
Hello,Worldの部分をOneThirdの内蔵エディタで変更できるようにタグを埋め込みます
以下のサンプルのようにテンプレートを修正してください
<!DOCTYPE html>
<html lang="en">
  <head>

    <meta http-equiv="X-UA-Compatible" content="IE=edge">
    <meta name="viewport" content="width=device-width, initial-scale=1">

     {$load('php',".data/theme")}{$ut->expand('head')}
     {$load('less',"{$config['site_url']}css/onethird.7")}

    <!-- Bootstrap -->
    <link href="{$params['data_url']}css/bootstrap.min.css" rel="stylesheet">

    <!-- HTML5 Shim and Respond.js IE8 support of HTML5 elements and media queries -->
    <!-- WARNING: Respond.js doesn't work if you view the page via file:// -->
    <!--[if lt IE 9]>
      echo error- src="https://oss.maxcdn.com/html5shiv/3.7.2/html5shiv.min.js"></script>
      echo error- src="https://oss.maxcdn.com/respond/1.4.2/respond.min.js"></script>
    <![endif]-->
   {$ut->expand('css',1)}{$ut->expand_sorted('js',1)}
  </head>
  <body>
    <div class="container">
      <div class="row">
        <div class="col-md-12">
          {$ut->expand('article')}
        </div>
      </div>
    </div>
    <!-- jQuery (necessary for Bootstrap's JavaScript plugins) -->
    echo error- src="https://ajax.googleapis.com/ajax/libs/jquery/1.11.1/jquery.min.js"></script>
    <!-- Include all compiled plugins (below), or include individual files as needed -->
    echo error- src="{$params['data_url']}js/bootstrap.min.js"></script>
     {$call('system_toolbar')}{$ut->expand('meta')}
  </body>
</html>
これで、もともとインストール時に設定されていたページデータが表示されます
{$ut->expand('article')}
は、各ページの本文を表示修正するためのタグです
システムメニューの「ページ編集 (page edit)」か、ブロックメニュー(左端のホバーメニュー)の![]() をクリックすると編集することができます
をクリックすると編集することができます
他にも様々なタグが用意されています
詳しくはテンプレートタグについてを参照してください